About Daves INORTHER19
The Station Equipment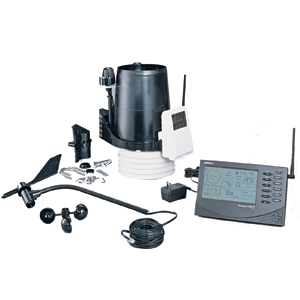
|
The Console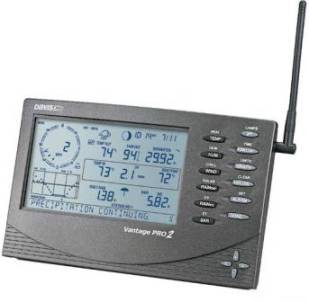
|
This station comprises of a Davis Vantage Pro2 (wireless) with a weatherlink USB module fitted to the console. I use a USB connection to a meteobridge hub for logging and posting of data. This will be upgraded to a meteobridge pro in the near future (Jan 2019)
The data is then posted to my internet host using the meteobridges inbuilt FTP engine as a raw text string every 10 seconds.
Specifications for the Wireless ISS
Complete specifications for the ISS and other products are available in the Weather Support section of our website at www.davisnet.com.
Temperature range: . . . . . . . . . . . . . . . . -40 to 150° Fahrenheit (-40 to 65° Celsius)
Transmission frequency: . . . . . . . . . . . . 902 - 928 MHz FHSS for North America
868.0 -868.6 MHz FHSS for overseas versions: EU, UK,
and OV
Transmitter ID codes: . . . . . . . . . . . . . . 8 user-selectable
License: . . . . . . . . . . . . . . . . . . . . . . . . . Low power (less than 8 mW), no license required
Primary power: . . . . . . . . . . . . . . . . . . . Solar power Davis solar charger
Backup power: . . . . . . . . . . . . . . . . . . . . CR-123A 3-volt lithium battery (8 months without sunlight-
greater than 2 years depending on solar charging)
Alternate power . . . . . . . . . . . . . . . . . . . AC power adapter
ISS Weather Variable Update Intervals
(Transmitter ID Dependent)Wind speed: . . . . . . . . . . . . . . . . . . . . . . 2.5 to 3 seconds
Wind direction: . . . . . . . . . . . . . . . . . . . . 2.5 to 3 seconds
Accumulated rainfall: . . . . . . . . . . . . . . . 20 to 24 seconds
Rain rate: . . . . . . . . . . . . . . . . . . . . . . . . 20 to 24 seconds
Outside temperature: . . . . . . . . . . . . . . . 10 to 12 seconds
Outside humidity: . . . . . . . . . . . . . . . . . . 50 seconds to 1 minute
Ultraviolet radiation: . . . . . . . . . . . . . . . . 50 seconds to 1 minute (NOT fitted to my station)
Solar radiation: . . . . . . . . . . . . . . . . . . . 50 seconds to 1 minute (NOT fitted to my station)<
Making the best use of space available
As I live in a unit in a small complex , backyard space is not ample. By making use of the Carport structure I have achieved a reasonable layout with results close to that of the airport 4.5 kilometers from me.
The wind speed and direction sensors are afixed to a guyed mast with a total height of the sensor 8.5 meters above ground level. The mast has been constructed using 4 meters of 35mm, 3mm walled aluminium tube as the base pole. This section has been mounted to the carport structure with the bottom of the section 2 meters above ground.
The top section is constructed using a 6.5 meter section of 25mm , 3mm walled aluminium tube. This has been fitted internally to the 35 mm tube, allowing the mast to be readily dropped from 8.5 meters to 6.5 meters in the advent of extreme weather, ie a cyclone.
The Rain Gauge, Temperature and humidity sensor are housed in the integrated sensor housing shown fixed atop the carport.
The Mast and ISS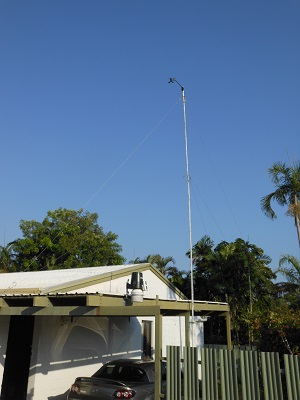
|
The Integrated Sensors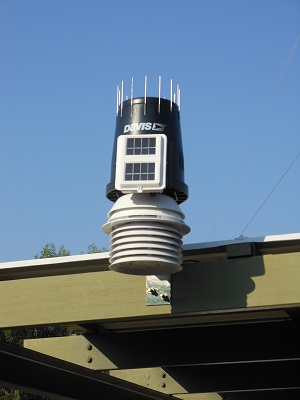
|
Home made Solar Radiation Shield for my earlier Lacrosse Station (failed after lightning storm)
The Tx9U Temperature, Relative Humidity and Data Transmitter has been housed in a home built Solar Radiation Shield. This was undertaken to lessen the temperature spikes experienced from the sensor being exposed to direct sun in the afternoons.
These photos were taken at the troublesome time of day which was typically from 14:30 through to 16:45.
The Solar Shield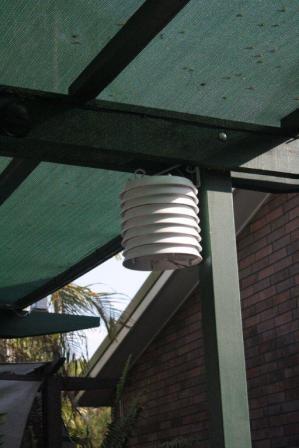
|
Tx9 Mounting in Solar Shield 2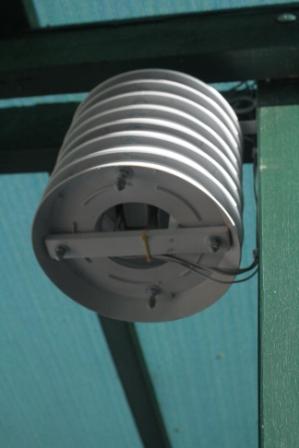
|
Construction of the Shield
The sheild was constructed using 8 plastic pot holders, 300mm in diameter. A 100mm hole was cut into the centre off all holders except the top lid. These werre then fixed together with 1/4" threaded rod, with approximately 25mm spacing between the layers.
For my setup I used small lengths of 6mm plastic tubing cut to 15mm as a spacer between the nuts and falt washers used to secure each of the layers. If you look closely at the rods in the "Assembling the holders" photo you will see these spacers.
Preparing the holders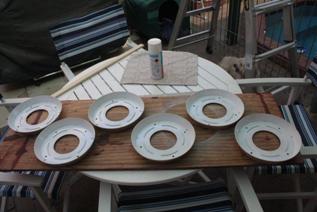
|
Assembling the holders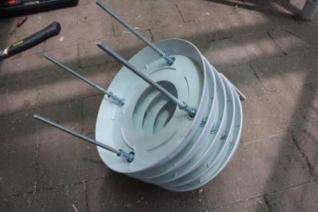
|
About This Website
This site is a template design by CarterLake.org with PHP conversion by Saratoga-Weather.org.
Special thanks go to Kevin Reed at TNET Weather for his work on the original Carterlake templates, and his design for the common website PHP management.
Special thanks to Mike Challis of Long Beach WA for his wind-rose generator, Theme Switcher and CSS styling help with these templates.
Special thanks go to Ken True of Saratoga-Weather.org for the AJAX conditions display, dashboard and integration of the TNET Weather common PHP site design for this site.
Template is originally based on Designs by Haran.
This template is XHTML 1.0 compliant. Validate the XHTML and CSS of this page.